
Monday, June 11, 2012

Sunday, June 10, 2012
Launched and Sailing
On Friday the boat yard launched “Thanks Dad”, stepped and
tuned the mast. They asked me to come up
because they had a couple questions. So I left work at 10:00 am and got there
at 11:00am. It turns out that an important piece of hardware was missing from
one of the “shrouds” (cable that support the mast at the sides). The missing piece was a metric M10 left hand turnbuckle
jaw. They don’t have them and couldn’t
find a supplier who had then either. So
they are going to make a new shroud using American standard fittings. It will be a couple days until they get the
parts, but I could still go sailing without that shroud.
 |
| Guy tuning the mast |
 |
| Mast is up and the boom is on |
On Saturday, my brother had to work, so I asked an
experienced sailor friend from work to help me move the boat from the boat yard
to its new home at the Waukegan marina (a short
trip out of the Waukegan Maryland
 |
| My friend bringing in the mooring lines |
 |
| Me at the helm coming out of the Waukegan harbor channel |
We got into the marina and tied up at “Thanks Dad’s” new
address, Dock 6, slip 3. My friend had
to leave and I spent the rest of the day doing a few odds and ends, like wiring
the mast lights to the boats electrical systems, priming and then painting the
area in the cockpit where the cockpit seat backs would be mounted.
 |
| Thanks Dad's new home0 |
We motored out of the marina for about 15 minutes, then raised the sails and headed mostly east for 45 minutes. We came about and head back to
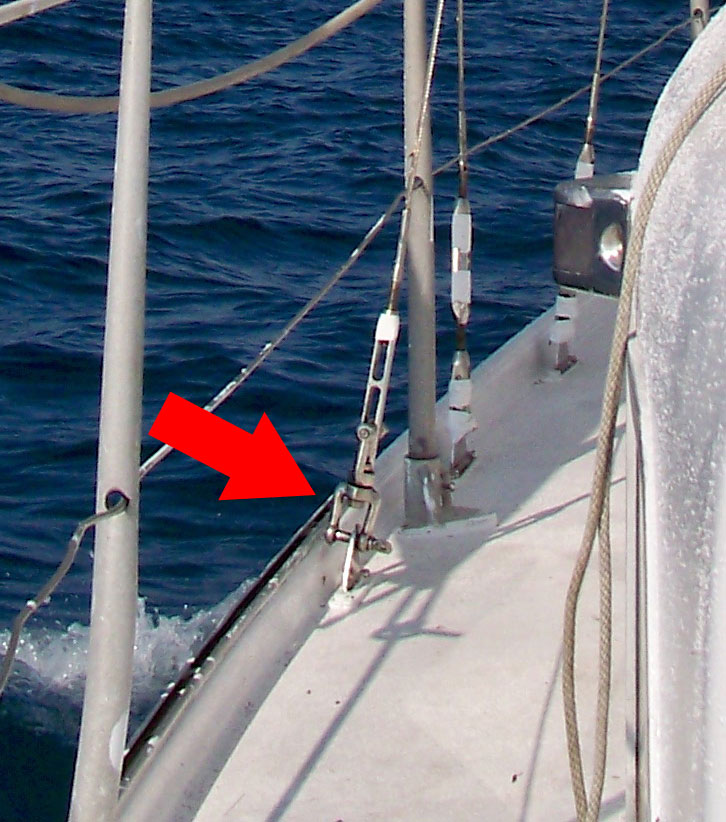 |
| Temp shroud fix. You can see the normal hardware on the 2 shrouds just forward. |
 |
| My brother took us out of the marina |
 |
| and he was at the helm when we put up the sails heading east. |
 |
| I took the helm when we started heading back. |
 |
| Back at the boat yard to wait for the new shroud later next week. |
 |
| You can see the newly varnished cockpit coamings installed |
Sunday, June 3, 2012
Long weekend of work but we’re ready for launch!
My brother and I took Friday off from work. We really wanted to finish all the prep work this
weekend and get this baby in the water.
On Friday we finished up all the thru hull fitting work. We had to reconnect the cockpit drain tubes to the new thru hull fittings. We also finished the cooling water intake for the engine and all its connections. There is a water filter in the cooling water system for the engine. We needed a new 0-ring for it and luckily, after some digging in their stockroom, the guy at the boat yard’s parts dept found what we needed.
My brother touched up the paint that had gotten under the tape when I painted the rub rail last weekend.
I did the terminations and wiring of the anchor light and antenna at the top of the mast and the steaming light that is half way up the mast.
I also reinstalled the tabernacle that I had sandblasted several weeks ago.
We installed new gate sections for the lower lifelines.
I installed and painted new “plugs” on the cabin wall just outside the starboard side of the companionway. There are two 4” diameter holes there where long gone instruments had been mounted. Maybe at some point in the future we will put new instruments there.
I also put the newly modified, sanded and varnished companionway hatch boards on. Looks pretty nice.
Saturday was a short boat day. I rewired and tested the bilge pump and
cleaned the bilge area while I there.
Sunday was the long day. Left the house at 9:00 am and got home at 10:00 pm.
My brother cleaned the area under the cockpit sole where the 2 boat batteries are located and installed new straps for them.
I installed the antenna and windex (aka wind vane) at the
top of the mast and then tested the antenna and the lights. Everything worked.
We also installed new “spreader boots” on the mast. These protect the forward sail to help prevent tearing or chaffing.
We installed a new shore power system. It charges the boat batteries and provides
power to the boat’s 12volt system when docked and plugged into 115VAC.
On Friday we finished up all the thru hull fitting work. We had to reconnect the cockpit drain tubes to the new thru hull fittings. We also finished the cooling water intake for the engine and all its connections. There is a water filter in the cooling water system for the engine. We needed a new 0-ring for it and luckily, after some digging in their stockroom, the guy at the boat yard’s parts dept found what we needed.
 |
| Port side cockpit drain all done |
My brother touched up the paint that had gotten under the tape when I painted the rub rail last weekend.
 |
| Rub rail looking sharp |
I did the terminations and wiring of the anchor light and antenna at the top of the mast and the steaming light that is half way up the mast.
 |
| Anchor light and antenna wiring |
 |
| Steaming light wiring |
I also reinstalled the tabernacle that I had sandblasted several weeks ago.
 |
| Tabernacle installed |
We installed new gate sections for the lower lifelines.
 |
| Lower lifeline gates |
I installed and painted new “plugs” on the cabin wall just outside the starboard side of the companionway. There are two 4” diameter holes there where long gone instruments had been mounted. Maybe at some point in the future we will put new instruments there.
I also put the newly modified, sanded and varnished companionway hatch boards on. Looks pretty nice.
 |
| Companionway hatch boards installed and cabin wall "plugs" installed and painted |
 |
| Looking sharp! |
Sunday was the long day. Left the house at 9:00 am and got home at 10:00 pm.
My brother cleaned the area under the cockpit sole where the 2 boat batteries are located and installed new straps for them.
He also did some work on the deck drains that necessitated
him climbing into the port side cockpit locker.
It is a pretty tight space.
Especially for an old guy.
 |
| Old guy in port locker. Battery straps installed. |
 |
| Antenna & Windex installed and anchor light working |
 |
| Steaming light works too |
We also installed new “spreader boots” on the mast. These protect the forward sail to help prevent tearing or chaffing.
 |
| Spreader boots installed |
My brother greased the ”stuffing box”. The stuffing box is the box like device where
the propeller shaft passes through the hull from the inboard engine to the
propeller. The grease helps to minimize
water from leaking around this area.
I rewired and tested the navigations lights.
The last thing we did (as
the sun was setting in the west) was to put the name on the boat. My oldest daughter got a thing call a “Silhouette”.
It is like a computer printer, but instead of printing it cuts things. Paper, fabric or in our case adhesive backed vinyl. We picked a font, size and design and she cut
a template out from the vinyl. We put
the template in place and painted the name on the back of the boat.
So “Thanks Dad” is ready to be launched. I submitted the paperwork to the boat yard to schedule the launch. They will also “step the mast” (meaning they will put the mast up) and “tune the mast” (meaning they will make the adjustments to insure the mast is straight and has all the proper tensions on the stays.)
 |
| My brother pealing the last of the name template away. |
So “Thanks Dad” is ready to be launched. I submitted the paperwork to the boat yard to schedule the launch. They will also “step the mast” (meaning they will put the mast up) and “tune the mast” (meaning they will make the adjustments to insure the mast is straight and has all the proper tensions on the stays.)
 |
| Ready for launch! |
If all goes well we
should be able to move the boat from the
boat yard to the marina on Saturday.
Monday, May 28, 2012
Productive Week
On Wednesday this past week my brother took the day off work
and finished painting the deck and cabin top I primed last weekend. Looking good!
It was a hot day and he also had a 2 Advil day and slipped on the ladder
twisting his foot.
The three day weekend was helpful in getting things accomplished.
On Sunday I taped and painted the rub rail and I also reinstalled the newly varnished companionway hatch and the forward hatch.
On Monday my brother and I put the boot stripe (accent stripe above the water line) decal on. It is 2.5 inches with a metallic charcoal stripe that is 1/8, a silver stripe that is 1/4, a red stripe that is 3/4 with another slightly darker red stripe that is also 3/4 wide.

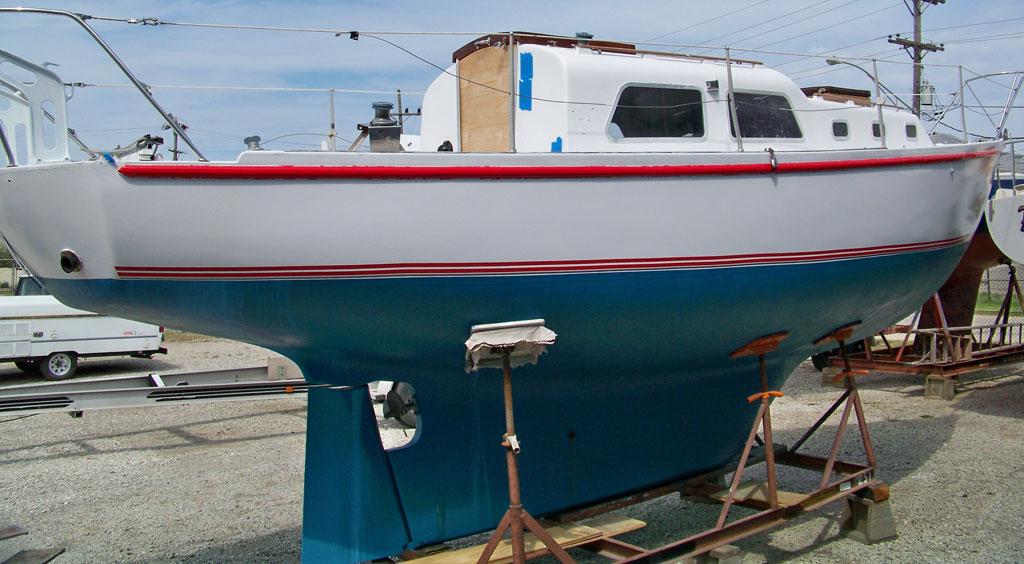
 We also installed 2 of the 3 thru hull fittings with new valves that needed replacement. We completed the 2 larger (1”) cockpit drain thru hulls and only dry fitted the smaller (1/2”) engine cooling water intake before we had to leave for the day.
All in all a pretty productive week.
 |
| Newly painted deck and cabin top |
Saturday morning it was raining at the boat yard so I stayed home and fashioned a replacement section of rub rail to replace the missing piece on the starboard side. I was 3 feet long. I was able to use my router to get the main contours and cut-out, but had to hand sand the section to get the profile to be the same as the rest of the rub rail. It had stopped raining by late morning so I headed up to the boat yard to install the new rub rail section.
 |
| New section next to a piece of the old broken section |
 |
| Before |
 |
| After installing the new rub rail section |
 |
| Port side taped and painted |
 |
| Port side with tape removed. Some of the red paint got under the tape, so we will need to do a little touchup. |
 |
| Hatches reinstalled |
 |
| New boot stripe |

 |
| Red arrows show where the thru hull fittings are. This is under the cockpit sole (floor). Not much space to work in. |
 |
| Starboard side bottom showing the larger cockpit drain thru hull and the smaller one for the engine cooling water intake. |
 |
| Port side bottom showing the cockpit drain thru hull. |
Sunday, May 20, 2012
Started the painting process for the decks and cabin top
This weekend it was hot! Temps in the high 80’s near the
lake and very very sunny.
On Saturday I washed, sanded and wiped down (with acetone) the decks, cockpit and cabin top. I then primed the forward and port side decks and the port side half of the cabin top. Did I mention it was hot? It was hot. I think I lost half my body weight in perspiration. Also I was very sore from all the ups and downs and contortions necessary to prime the decks. It was a 2 ibuprofen evening when I got home.
On Sunday I finished priming the decks and cabin top (starboard side). I did not get to do the cockpit as the weather forecast was calling for storms in the afternoon starting at 3:00 pm. I stopped priming at 1:30 in order to make sure everything had a chance to dry before the rain hit.
I did a few small things until 3:00, then “buttoned up” the boat and went home.
Once home I put the first coat of varnish on the companionway hatch boards.
Sunday was not as bad as Saturday for the heat and I finished 3 hours earlier so it was only a 1 ibuprofen evening.
On Saturday I washed, sanded and wiped down (with acetone) the decks, cockpit and cabin top. I then primed the forward and port side decks and the port side half of the cabin top. Did I mention it was hot? It was hot. I think I lost half my body weight in perspiration. Also I was very sore from all the ups and downs and contortions necessary to prime the decks. It was a 2 ibuprofen evening when I got home.
On Sunday I finished priming the decks and cabin top (starboard side). I did not get to do the cockpit as the weather forecast was calling for storms in the afternoon starting at 3:00 pm. I stopped priming at 1:30 in order to make sure everything had a chance to dry before the rain hit.
I did a few small things until 3:00, then “buttoned up” the boat and went home.
Once home I put the first coat of varnish on the companionway hatch boards.
Sunday was not as bad as Saturday for the heat and I finished 3 hours earlier so it was only a 1 ibuprofen evening.
 |
| Decks and cabin top primed. |
Sunday, May 13, 2012
Inventory and more painting
This weekend on Saturday it was too wet for painting, but I
was able to remove a broken thru-hull fitting with a bit of an effort, a
file and a hacksaw. I also took inventory
of the lines and bumpers stored in the cockpit lockers. Plenty of lines, but need to buy a couple
bumpers.
The weather on Sunday was beautiful! My brother and I painted the hull above the
waterline that we had primed last week.
Last thing we need to do in terms of the hull is repair the missing section of rub rail, and then add the boot stripe
and name.
 |
|
Doesn't look
much different than it did after the priming except it is shinier.
You can see reflections in the bow area. |
Tuesday, May 8, 2012
Started Painting....Finally!
Finally the weather forecast calls for a few days of good
temps and no rain! My brother and I took
the day off work and primed the hull above the waterline and painted the
bottom.
 |
| Me priming the starboard side hull |
 |
| My brother painting the port side bottom |
 |
| Done for the day. Bottom painted and the hull primed. |
Sunday, May 6, 2012
Too much rain and more woodwork
Saturday my wife, my oldest daughter and I went to the boat
yard to start painting....finally! We left the house at 9:30am made a couple
stops and got to the boat yard at 11:30. Prior to leaving, weather.com said the
morning fog would go away by 11:00am and we would have partly cloudy skies
until 5:00pm when scatter showers would be likely. Since we would only be
priming, this was a good forecast. We got
there and it was raining/misting.
I checked weather.com again and now it said rain all day. We turned around and went back home.
Since it also rained most of the day Sunday, this weekend
turned out to be a woodworking weekend.
I put another couple coats of varnish on the Companionway and
forward hatches.
 |
| Companionway hatch with 3 coats of varish |
 |
| Forward hatch with 3 coats of varish |
I also added a piece of teak to either side of the companionway hatch boards to make them wider to fit in the new companionway with the aluminum extrusion slots.
 |
| Companionway hatch boards before |
 |
| Companionway hatch boards after sanding and adding a piece of teak to both side |
 |
| Companionway hatch boards after oiling them with teak oil. |
Sunday, April 29, 2012
Woodwork
This weekend I removed both the forward hatch and the main
companionway hatch to bring them home to sand, oil and varnish them.
Once they were removed I had to make temporary hatches to
keep the weather out of the boat.
 |
| Temporary forward hatch |
 |
| Temporary companionway hatch |
After I got them home I sanded them.
 |
| Forward hatch half sanded |
 |
| Forward hatch fully sanded |
 |
| Companionway hatch half sanded |
 |
| Companionway hatch fully sanded |
I will oil and start varnishing them later
this coming week.
The weather is not cooperating. I would have hoped to have painted by now,
but we haven't had 2 consecutive dry days with the temp above 40 degrees for
some time. This weekend at the boat it
rained both days. On Saturday I ended up
having to make the temporary forward hatch inside the boat to get out of the
rain. On Sunday I had to bring my shop
vac up to the boat to vacuum up all the saw dust from working inside the boat
on Saturday!
Subscribe to:
Posts (Atom)