Sunday, April 29, 2012

Woodwork

This weekend I removed both the forward hatch and the main companionway hatch to bring them home to sand, oil and varnish them.

Once they were removed I had to make temporary hatches to keep the weather out of the boat.
Temporary forward hatch

Temporary companionway hatch

After I got them home I sanded them.

Forward hatch half sanded

Forward hatch fully sanded

Companionway hatch half sanded

Companionway hatch fully sanded

I will oil and start varnishing them later this coming week.

The weather is not cooperating.  I would have hoped to have painted by now, but we haven't had 2 consecutive dry days with the temp above 40 degrees for some time.  This weekend at the boat it rained both days.  On Saturday I ended up having to make the temporary forward hatch inside the boat to get out of the rain.  On Sunday I had to bring my shop vac up to the boat to vacuum up all the saw dust from working inside the boat on Saturday!

Sunday, April 22, 2012

New Galley Counter Top and Varnishing

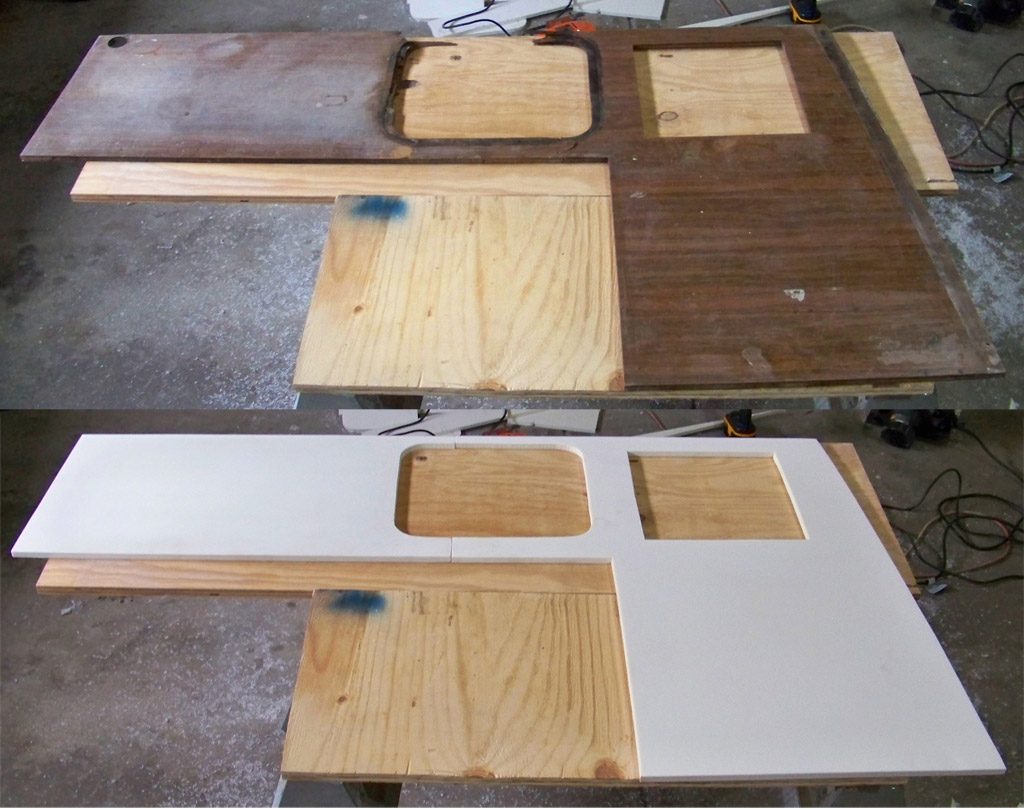
This weekend I made the new counter top for the galley using the rest of the "King Starboard" I bought a few weeks ago.  I used the old counter top as a template and traced the design onto the "King Starboard".  The installation on the boat went smoothly.  I like the way it looks.  Still need to install the sink.

Old and New Galley Counter Tops
New Galley Counter
New Galley Counter Top From Above.
I also put two layers of varnish on the cockpit seat backs.  I strung them up in the basement, suspending them from the ceiling to make the project easier.


Sunday, April 15, 2012

I like when things work out as I imaged them in my mind.


Last weekend I removed the aluminum “tabernacle” (shell support at the bottom of the mast in which the heel of the mast is stepped) and brought it to work on Friday to sandblast it for no other reason than to clean it up a bit.  It had some paint and oxidation on it.  It looks nice now.  I think it will make the boat go faster.
“tabernacle” before
“tabernacle” after

This weekend I installed the new “king starboard” panels to replace the delaminated plywood one that were on the cabin wall just inside the companionway.  As part of the process I wanted to “build out” the panels another 1.5 inches to have the panels cover the back of the compass, wires and any other things that had been or may be mounted in that area.  I designed and had the guys at work make stainless steel “straps” to mount the new panels to and provide the extra 1.5 inches I wanted.  I had bought some aluminum extrusions online to “trim out” the new panels and also to be the slot for the companionway hatch boards to slide into.  Looks exactly like I thought it would…I love it when a plan comes together.
2 of 3 starboard side "straps"

2 of 3 port side "straps"

New panels and extrusions installed

All done with temp companionway hatch board in place.

View top side
I also remove two more thru-hull fittings to be replaced.  These two are for the cockpit and deck drains.  I figured it was a good idea since the one for the engine water inlet broke so easily last weekend.  I might as well do them all now.  They will then be good for another 30 years or so.  Getting at them was a bit of a challenge.  I had to remove the access panel in the bottom of the cockpit, twist at an angle the human body was not designed to do and work will my head lower than my knees.  The space it also crowded and getting leverage on the wrench for the fittings, valves and hoses caused me to mumble bad things under my breath. 

Port side thru-hull fitting removed.  Three drain hose were feeding into it. Thru-hull hole in center of photo. 
Unscrewing the starboard side thru-hull fitting from the bottom


Sunday, April 8, 2012

Running the engine and other fun

Went to the boat yard twice this weekend.  On Friday my brother and I pulled new wires in the mast for the 2 lights on it.  The one at the top is the anchor light and another about half way up is the steaming light.  It was a bit easier than I anticipated.  We just attached the new wires (using electrical tape) to the old ones and then used the old wires to pull the new ones through.  No snags or issues pulling them through.

We also needed to replace the valve (seacock) on the bottom of the boat for the water inlet to the diesel engine.  The water is used to cool the engine.  When my dad lasted used the boat to motor from his slip to the boat yard in Maryland to have the boat hauled out of the water, he went to open the valve and the handle broke off in his hand. So we needed to change the valve.  When I put a little torque on the valve to remove it from the through-hull fitting.....it broke the fitting.  I was a bit worried that it would be a costly job to repair the through-hull fitting.   Fortunately, we were able to unscrew the old fitting out from the bottom of the boat and  the threads in the nut embedded in the hull of the boat are very clean and not corroded. 

We also tried to start the engine.  First we had to find a way to feed cooling water to the engine.  We filled a 5-gallon bucket with water and connected one end of a hose to the engine's water line infeed and the other end of the hose we place in the bucket.  We had  the garden hose ready to keep the bucket full as the engine pulled water from it.  Unfortunately the batteries (there are 2 on the boat) were not charged enough to turn over the engine. One of them is dead.  I took the other battery out of the boat and brought it home to charge it.

The next day we went to Kendore boat supply again to buy a new through-hull fitting, seacock and few dozen other items we thought we needed like a new lens for the steaming light.

New Thru-hull fitting and seacock
After visiting Kendore, I stopped at a Menards located by the boat yard.  They had a good deal on a marine battery so I bought a new one to go along with the newly charged older one.

I put both batteries back in the boat and setup the 5 gallon bucket again to provide cooling water.  This time the engine turned over and started after a couple tries.  That sound of the running engine is sweet music to my ears.  Once it started I had to check to make sure the water was running properly through the engine.  I did this by looking back over the transom (flat area at the very back of the boat) to make sure water was coming out of the exhaust.   It was.


Sunday, April 1, 2012

Productive Weekend at Home

I did not go to the boat yard this weekend.  I stayed home and used the “King Starboard” I bought at Kendore Boat Supply to fabricate new panels to replace the delaminated plywood ones that are on the cabin wall just inside the companionway.

Old Delaminated Panels

New King Starboard Panels

I also installed the new mast light I bought at Kendore onto the new mast mounting bracket I fabricate at work.  I also install a new wind vane (I bought this at the local store since Kendore didn’t carry them) on the mast mounting bracket.

Wind vane and mast light on the mast mounting bracket

I used a 2 part wood epoxy to do the repairs to the newly sanded cockpit seat backs.  There was a split in one of the seatbacks and a couple rot areas on both.  I then applied “teak oil”.  They need to dry for at least 72 hours before varnishing.

Sanded, repaired and oiled Cockpit seatbacks

Friday, March 30, 2012

Kendore Marine Boat Supply

After work I drove up to Franklin WI to check out Kendore Marine Boat Supply.  The guy at the local marine supply store told me about Kendore.  He said "if we can't provide what you’re looking for, they can."

Kendore has both new and used boat stuff.  The new stuff is a lot less expensive than the local store.

Marine wire (2 conductor 16 gauge) at the local store is 0.69 cents a foot.  Kendore’s price was 0.30 cents a foot.  I bought 200 feet.

The mast light that broke during hauling from Maryland to Illinois cost $39.95 at the local store. Kendore’s price was $19.50.  I bought it.

Clevis pins (used to connect the mast stays to the deck) at the local supply store cost $6.95 each.  Kendore’s price was $2.00 each.  I bought all they had.  Unfortunately they only had 3 of the size I needed.  L  I still need another 5.

I also bought some scrap ½ inch “ King Starboard”. King Starboard is a marine-grade polymer that can withstand the harshest marine conditions. It will not rot or discolor, and it will not delaminate like wood laminates and is easy to work with using standard woodworking tools.  The local store sells a sheet of 96” x 54” for $599.99.  Yep $599.99.  I bought a scrap piece that was 53” x 54” for $135.00

All in all, a good trip to Franklin WI.

Thursday, March 29, 2012

The Reveal

Today I sanded the cockpit "seat backs" and lo and behold, underneath the flaking paint, the teak is not that awful bad looking.  There are a couple rot areas, but overall it doesn't look too bad.  I’m thinking we can refinish them.
Before - After

Sunday, March 25, 2012

Out with the old ...

Today my brother and I remove the delaminated plywood inside the companionway area.  We weren't exactly sure how to go about doing it at first, but once we got started they come off pretty easily.  We also needed to fabricate a temporary companionway hatch board since without the plywood inside the companionway, there was nothing for the companionway hatch boards to slide into.

Before

After removing plywood

Since that went so well, we also removed the cockpit "seat backs".  They are teak, but some areas have gotten a bit rotted.  This process was a bit more cumbersome since one of us had to be in the cockpit with a screw driver (my brother) and the other inside the cabin on his back in the quarter berth with a ratchet wrench (me).  There were about 12 nuts and bolts in each cockpit "seat back" holding them to the boat.  Most of them came off without too much effort and cursing.  On one though we had to use the reciprocating saw to cut the bolt.
Before
After removing the Cockpit "seat back"


All and all we had a productive day.

Saturday, March 24, 2012

Power Spraying

The water was turned on at the boat yard today so I decided to power spray the boat.  I used engine cleaner/degreaser in the bilge and on the engine (it is a diesel), I also sprayed the deck, cockpit, hull and bottom. 

 I had to put up drop cloths in the cabin to prevent the overspray from getting everywhere.  Here are before and after shots of the bilge.  Captain Ed likes a clean bilge!


Friday, March 23, 2012

Mounting Bracket

There is a bracket at the top of the mast for mounting things like mast lights, wind vanes and VHF radio antennas.

The one on the boat was made from mild steel and was pretty corroded.

So I took it off, made a CAD drawing and had a new (slightly longer) one made up at work from stainless steel.....It looks nice and I think it will make the boat go faster!